Dataflow Builder - Exercise 1
Exercise Overview
In this tutorial, you will learn how to use the Dataflow Builder to create, implement, and run a dataflow. When completed, this dataflow will select fields from an existing dataset, group items by a single column value, calculate new fields, and save to a new dataset. The benefit of this process is that the dataflow can be repeated each time the original dataset is updated. This dataflow can be run as part of a larger set of operations via the Workflow Builder.
Objectives
- Create a new dataflow.
- Import a dataset, select fields, add a compound key, group items, add new fields, and export to a new dataset.
- Run a dataflow and check its completion.
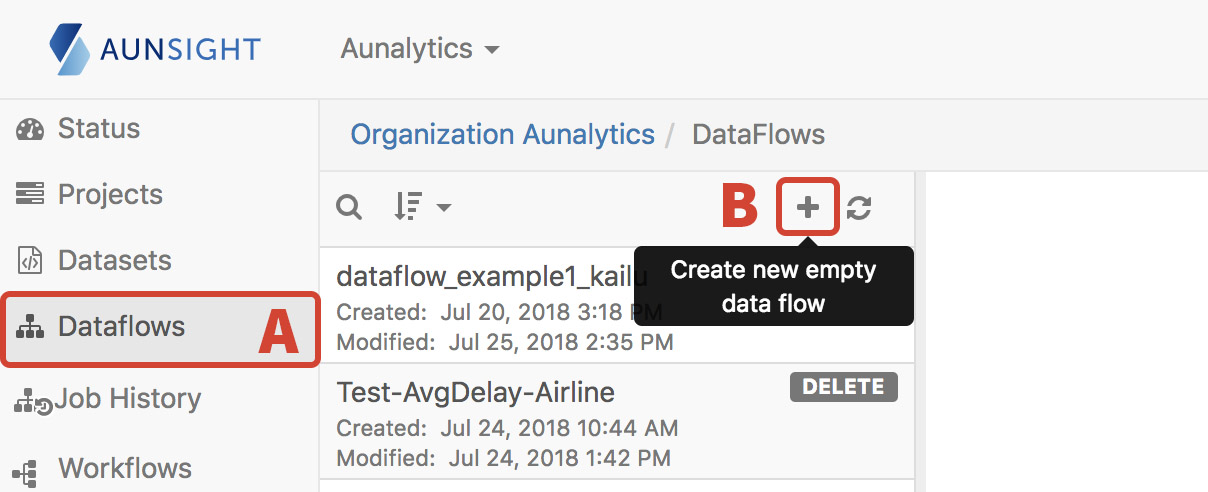
A) Creating a Dataflow
- After logging in to Aunsight and selecting the relevant organization, click on DataFlows in the menu bar on the left side of the screen.
- Click the plus button to create a new dataflow.
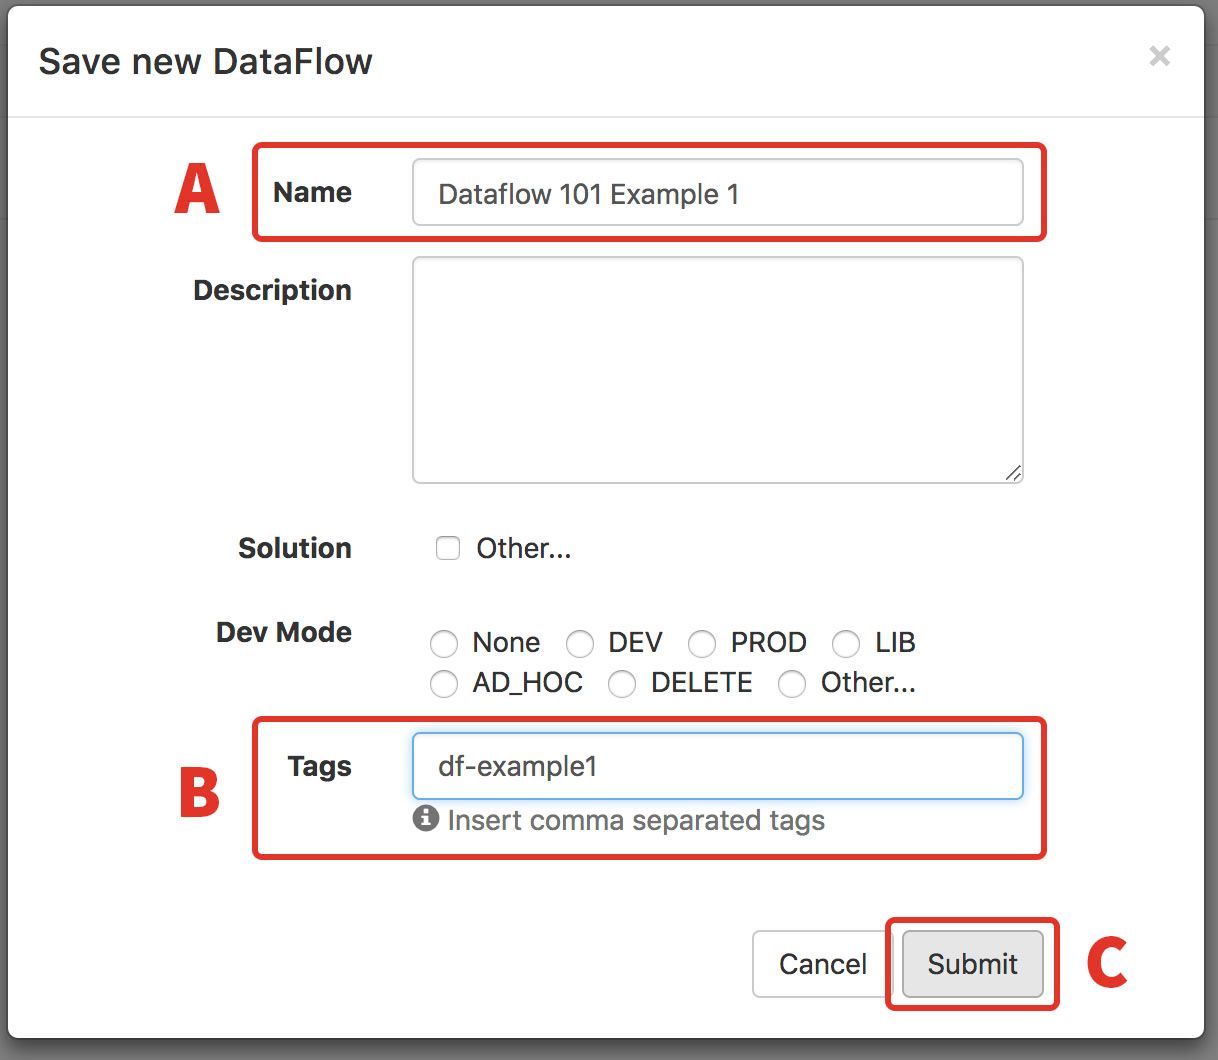
- Click the Save button.

- Enter some descriptive for your dataflow such as Dataflow101 Example 1. In the tags, enter df-example1. When finished, click Submit.
B) Implementing the Dataflow
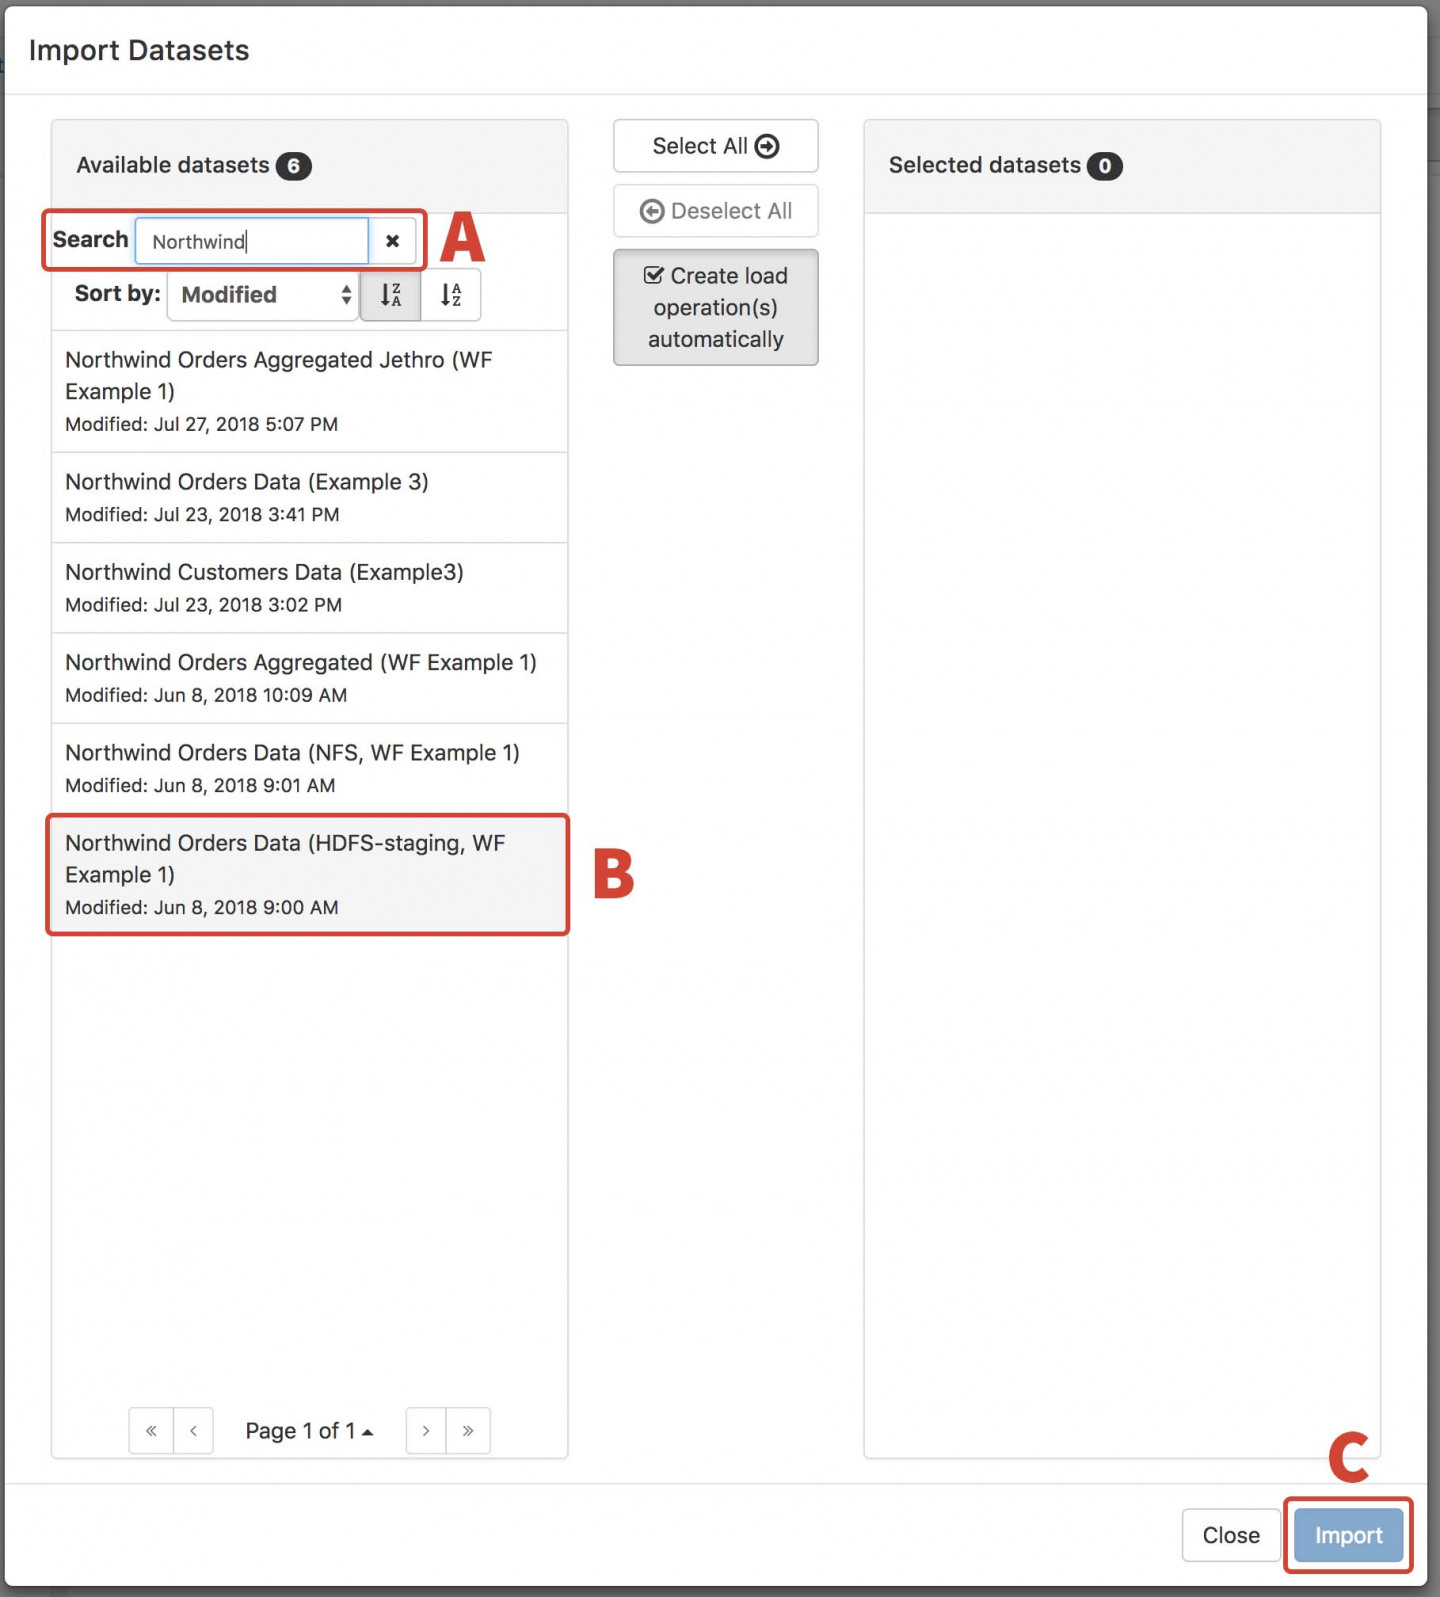
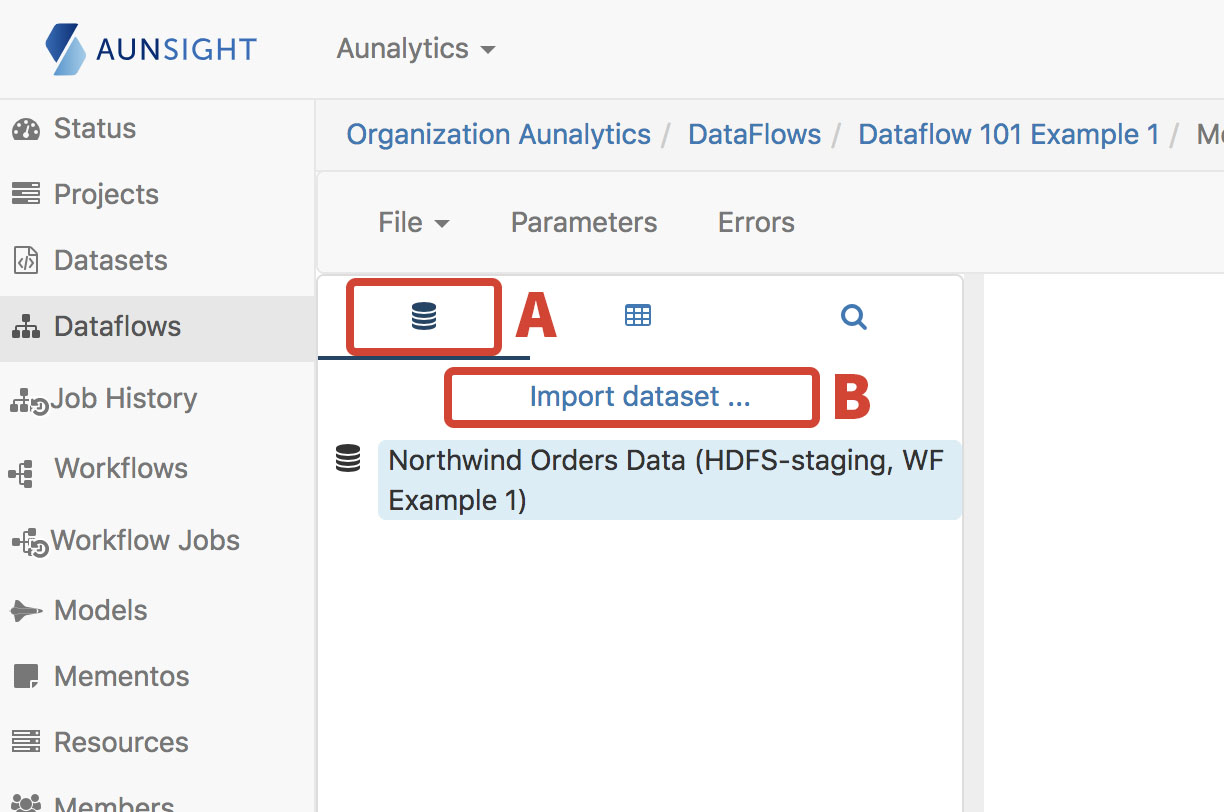
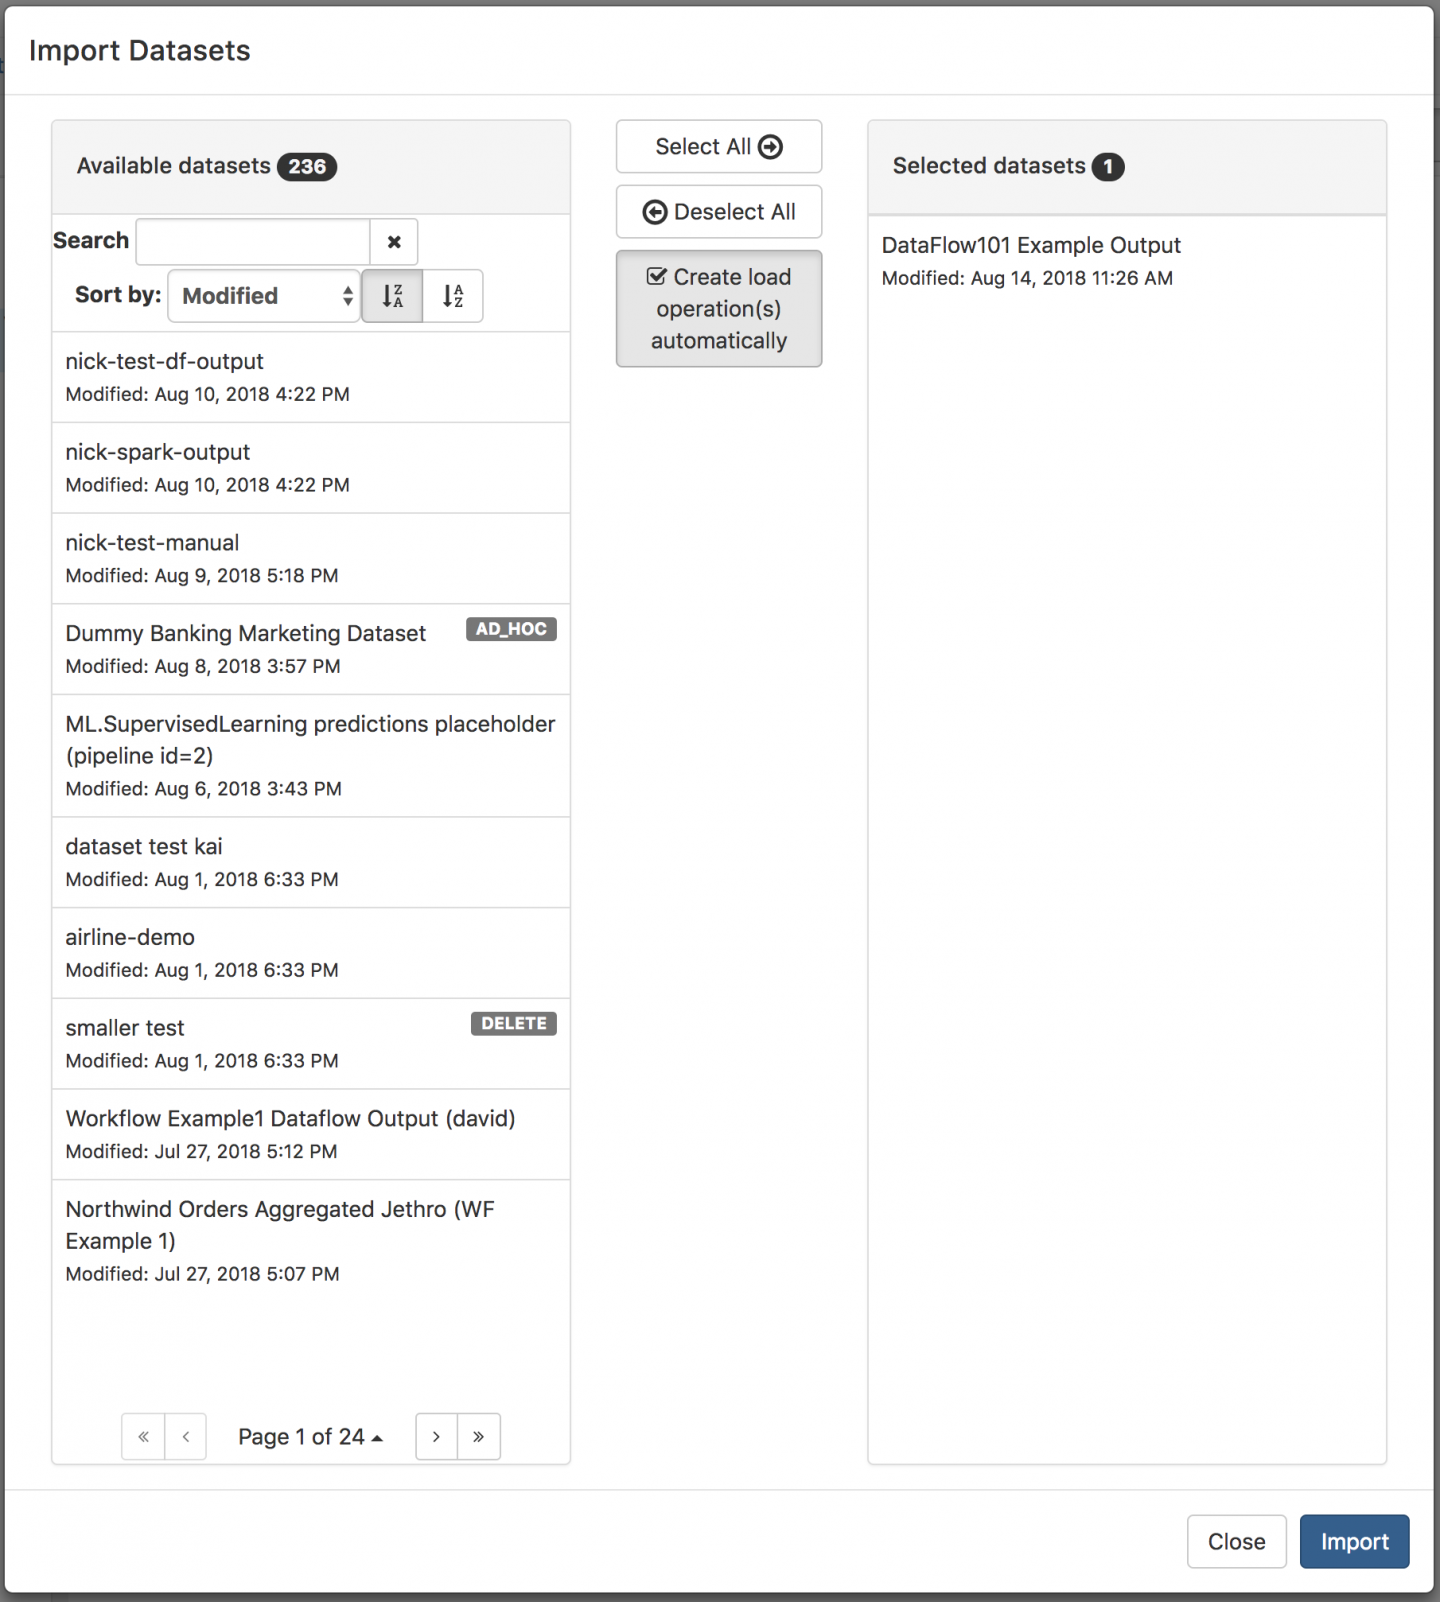
- From the dataflow’s detail page, click on Modify. On the next screen, click the Import Dataset button.


- Search for and select Northwind Orders Data (HDFS-staging, WF Example 1), and then click Import.
Dataset View After Import
| orderID | customerID | employeeID | orderDate | requiredDate | shippedDate | shipVia | freight | shipName | shipAddress | shipCity | shipRegion | shipPostalCode | shipCountry |
|---|---|---|---|---|---|---|---|---|---|---|---|---|---|
| 10248 | VINET | 5 | 1996-07-04 00:00:00.000 | 1996-08-01 00:00:00.000 | 1996-07-16 00:00:00.000 | 3 | 32.38 | Vins et alcools Chevalier | 59 rue de l’Abbaye | Reims | NULL | 5100 | France |
| 10249 | TOMSP | 6 | 1996-07-05 00:00:00.000 | 1996-08-16 00:00:00.000 | 1996-07-10 00:00:00.000 | 1 | 11.61 | Toms Spezialitaten | Luisenstr. 48 | Munster | NULL | 44087 | Germany |
| 10249 | TOMSP | 6 | 1996-07-08 00:00:00.000 | 1996-08-05 00:00:00.000 | 1996-07-12 00:00:00.000 | 2 | 65.83 | Toms Spezialitaten | Luisenstr. 48 | Munster | NULL | 44087 | Germany |
- With the dataset selected (make sure the bottom rectangle with the dataset name is highlighted), add the Select Fields operation from the right panel.
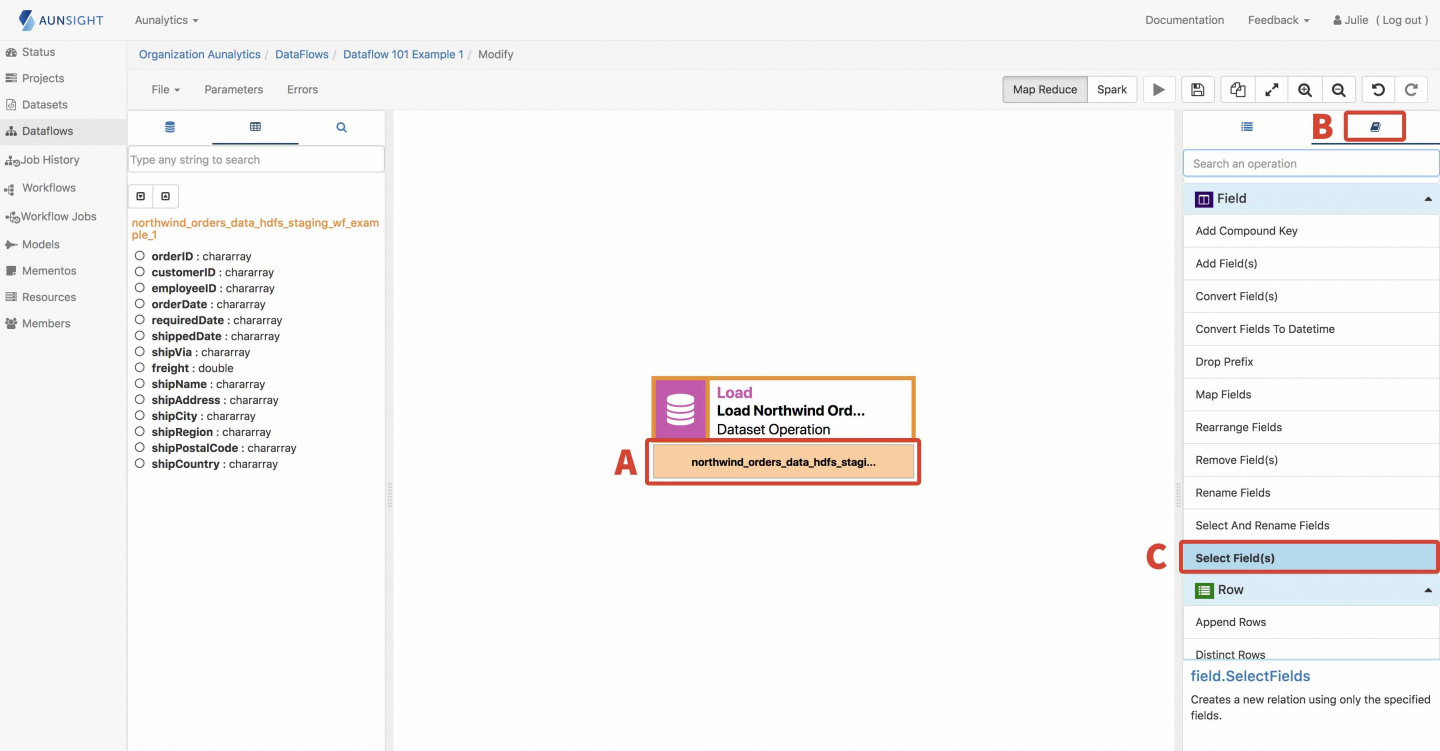
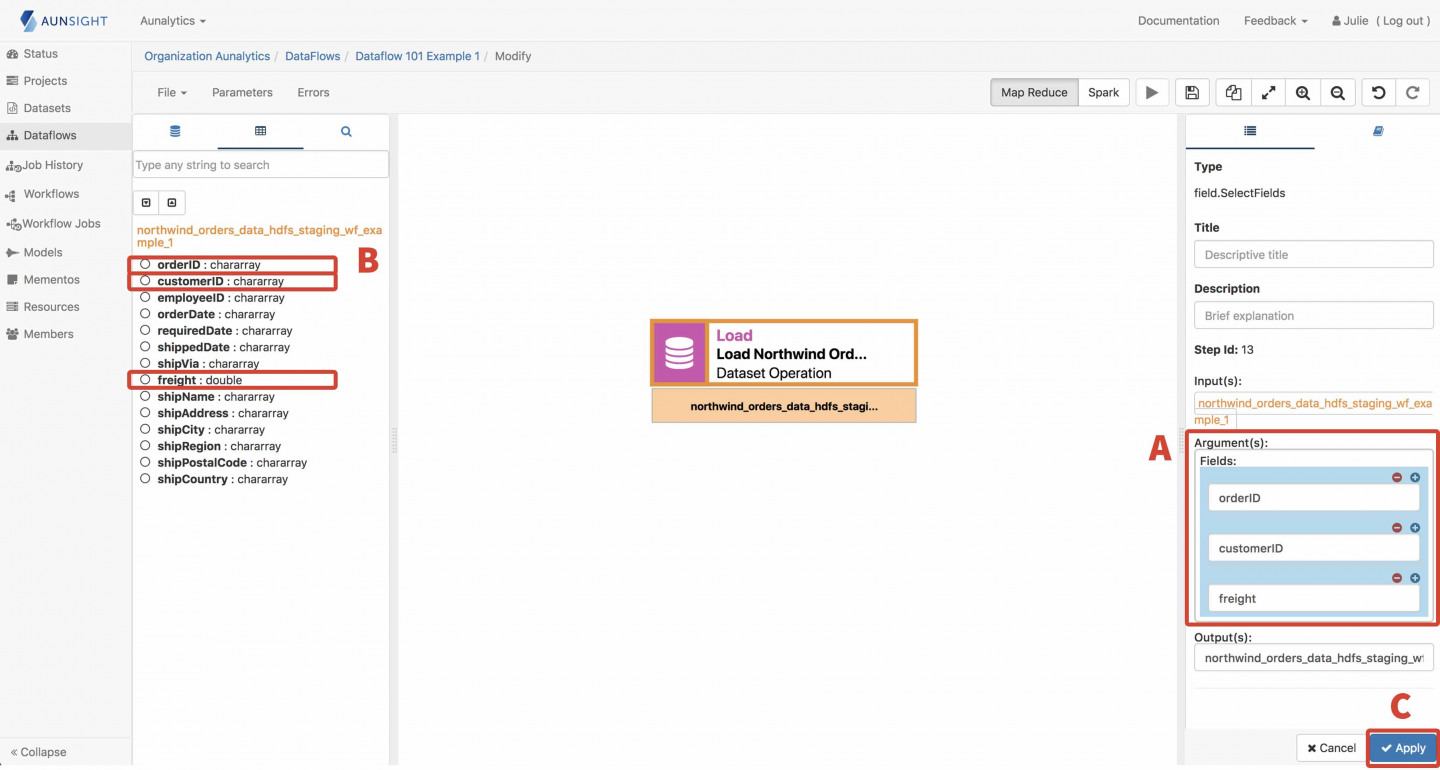
- In the Argument(s) box on the right side panel click on the box below Fields, then add the fields orderID, customerID, freight from the left panel. Hit Apply.
Dataset View After Select Fields
| orderID | customerID | freight |
|---|---|---|
| 10248 | VINET | 32.38 |
| 10249 | TOMSP | 11.61 |
| 10249 | TOMSP | 65.83 |
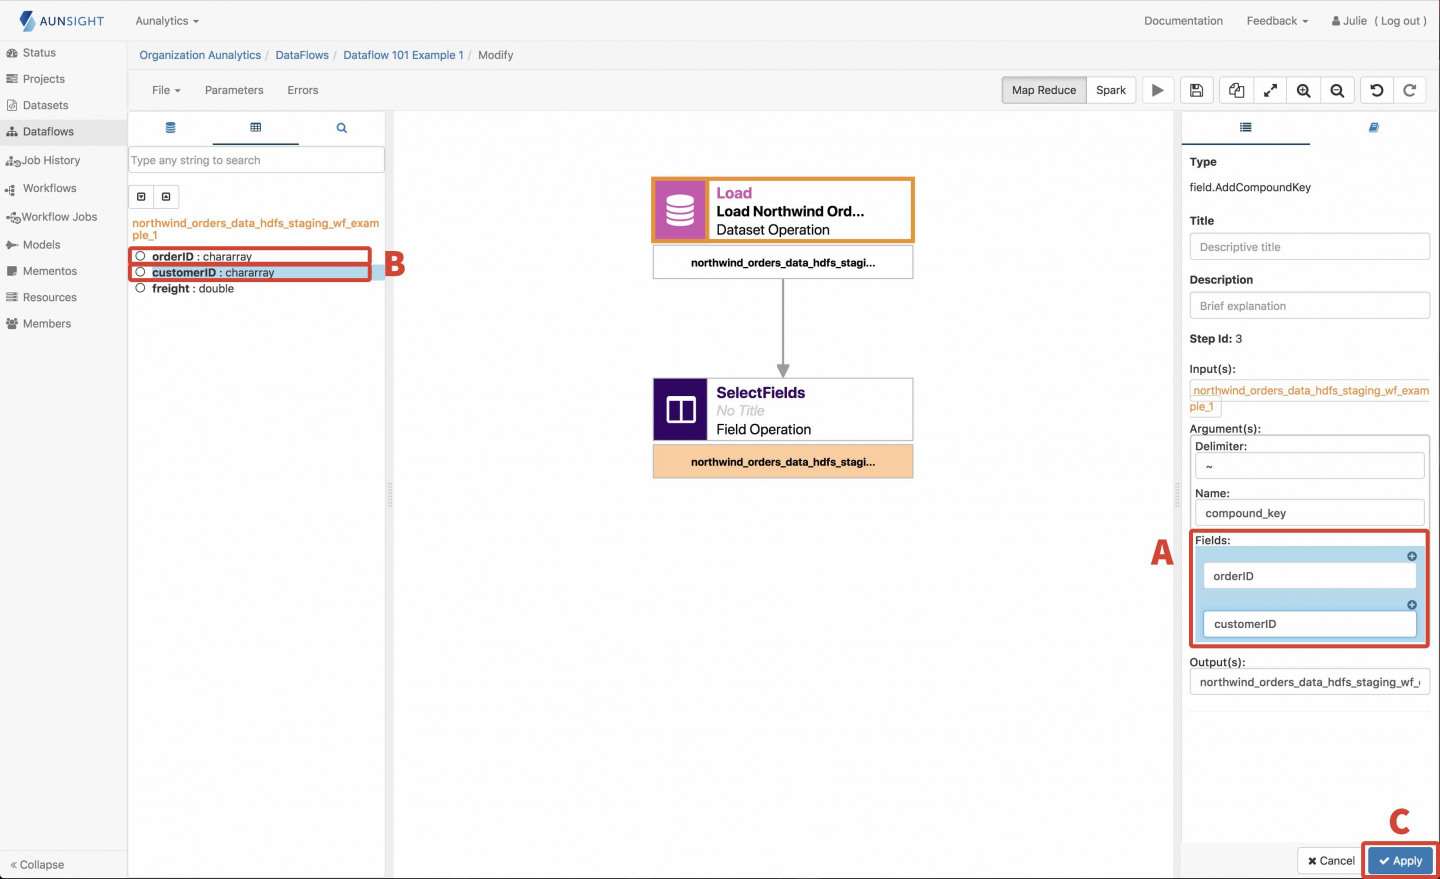
- Select the dataset at the end of the Select Fields Operation, and add the Add Compound Key operation.
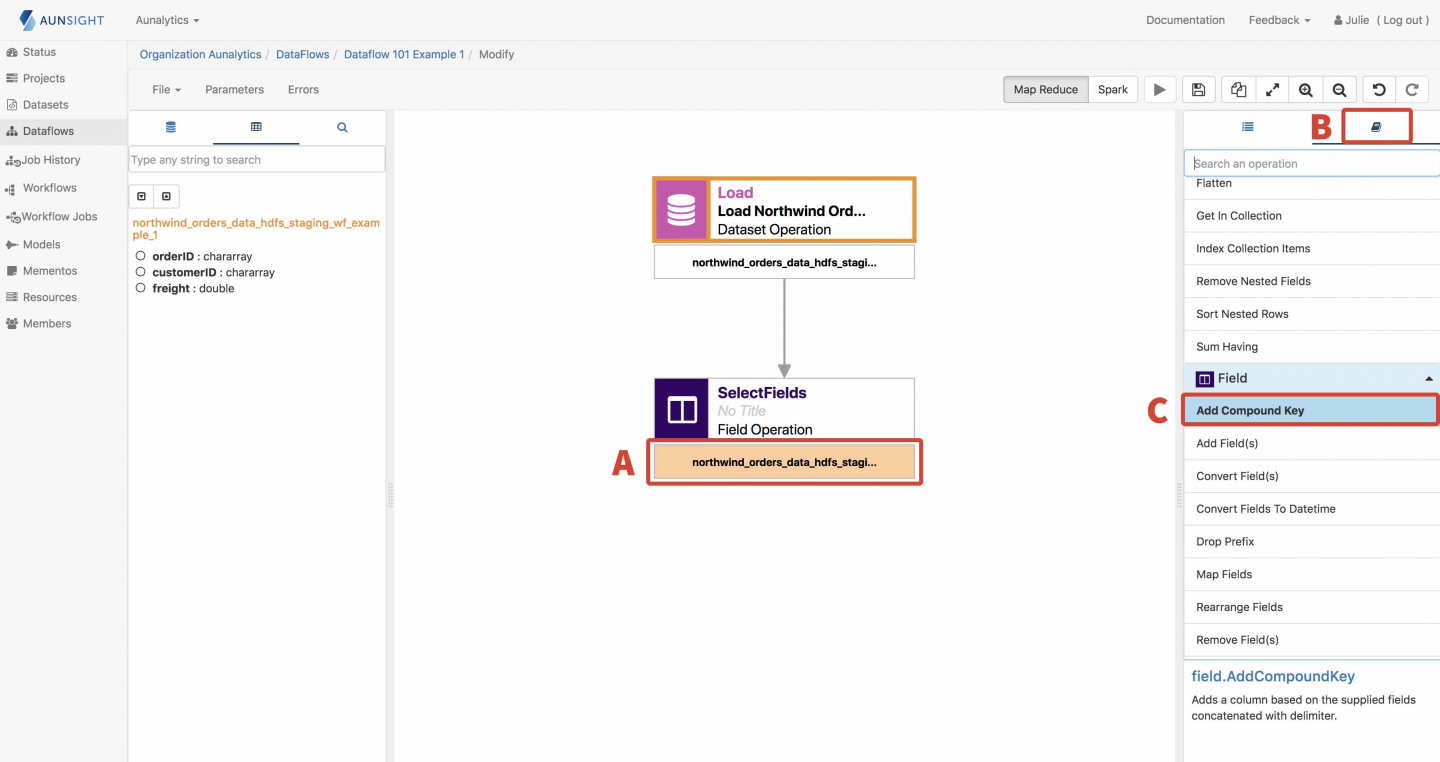
- Add the fields orderID and customerID from the left side panel, and then hit Apply.
Dataset View After Add Compound Key
| compound_key | orderID | customerID | freight |
|---|---|---|---|
| 10248~VINET | 10248 | VINET | 32.38 |
| 10249~TOMSP | 10249 | TOMSP | 11.61 |
| 10249~TOMSP | 10249 | TOMSP | 65.83 |
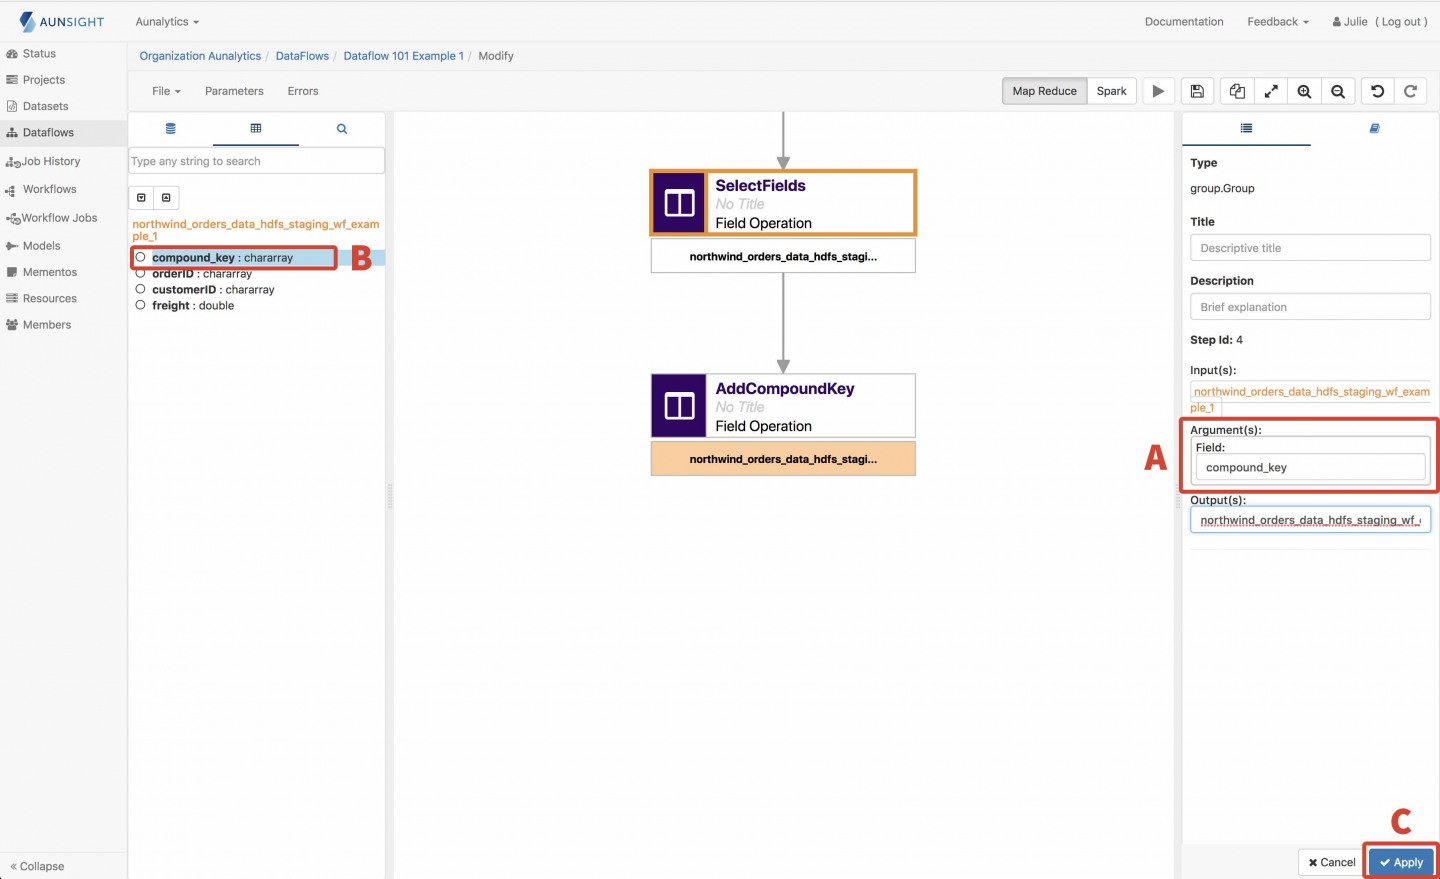
- Select the dataset at the end of Add Compound Key, and add the Group operation.
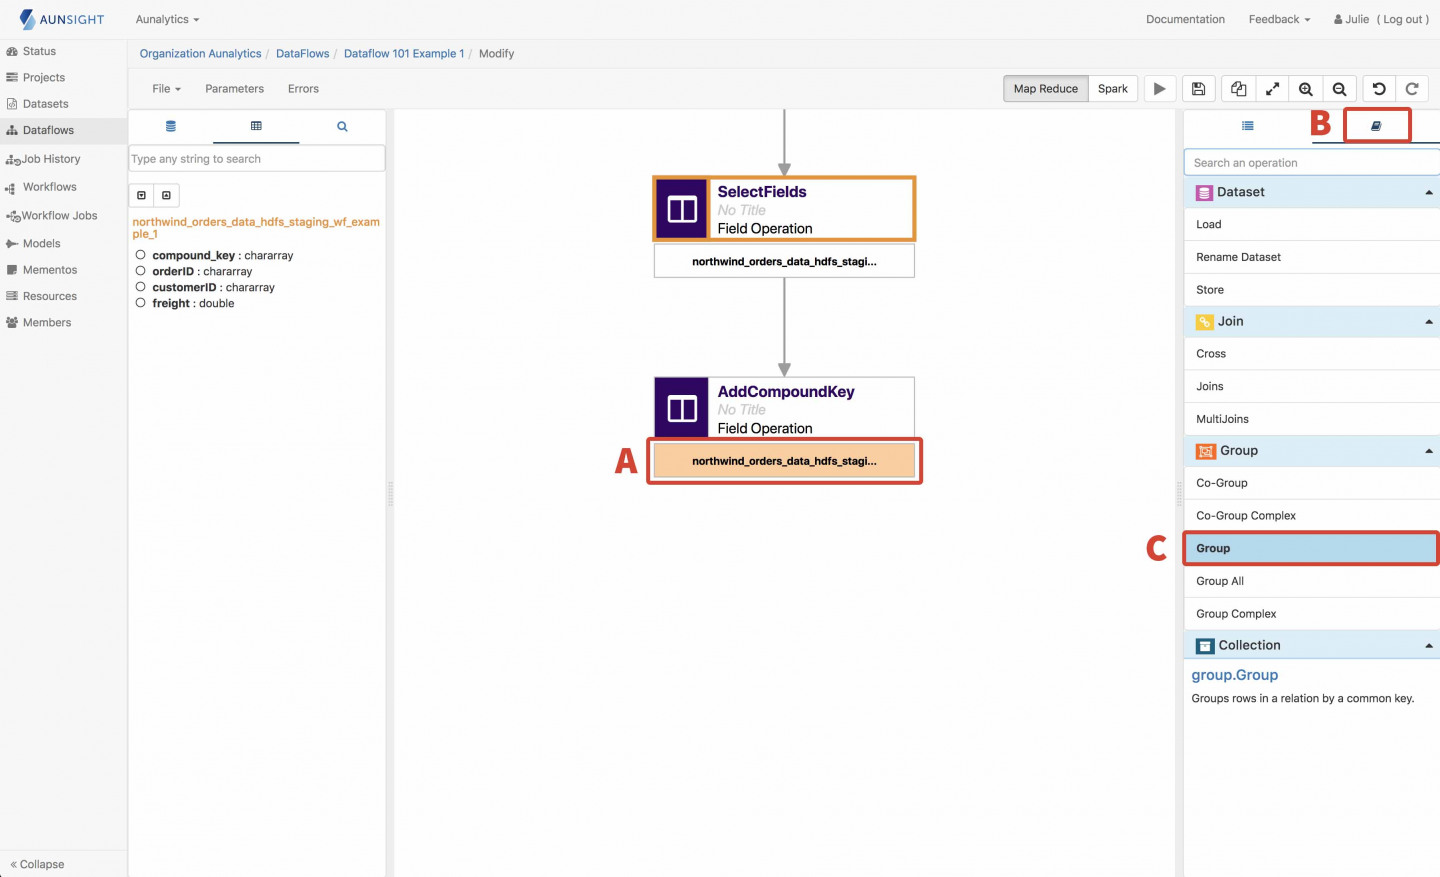
- Add the field compound_key to the Field argument by selecting it from the list on the left side panel, then hit Apply.
Dataset View After Group
| group | northwind_orders_data_hdfs_staging_wf_example_1 |
|---|---|
| 10248~VINET | [{“compound_key”: “10248~VINET”, “orderID”: “10248”, “customerID”: “VINET”, “freight”: 32.38}] |
| 10249~TOMSP | [{“compound_key”: “10249~TOMSP”, “orderID”: “10249”, “customerID”: “TOMSP”, “freight”: 11.61}, {“compound_key”: “10249~TOMSP”, “orderID”: “10249”, “customerID”: “TOMSP”, “freight”: 65.83} ] |
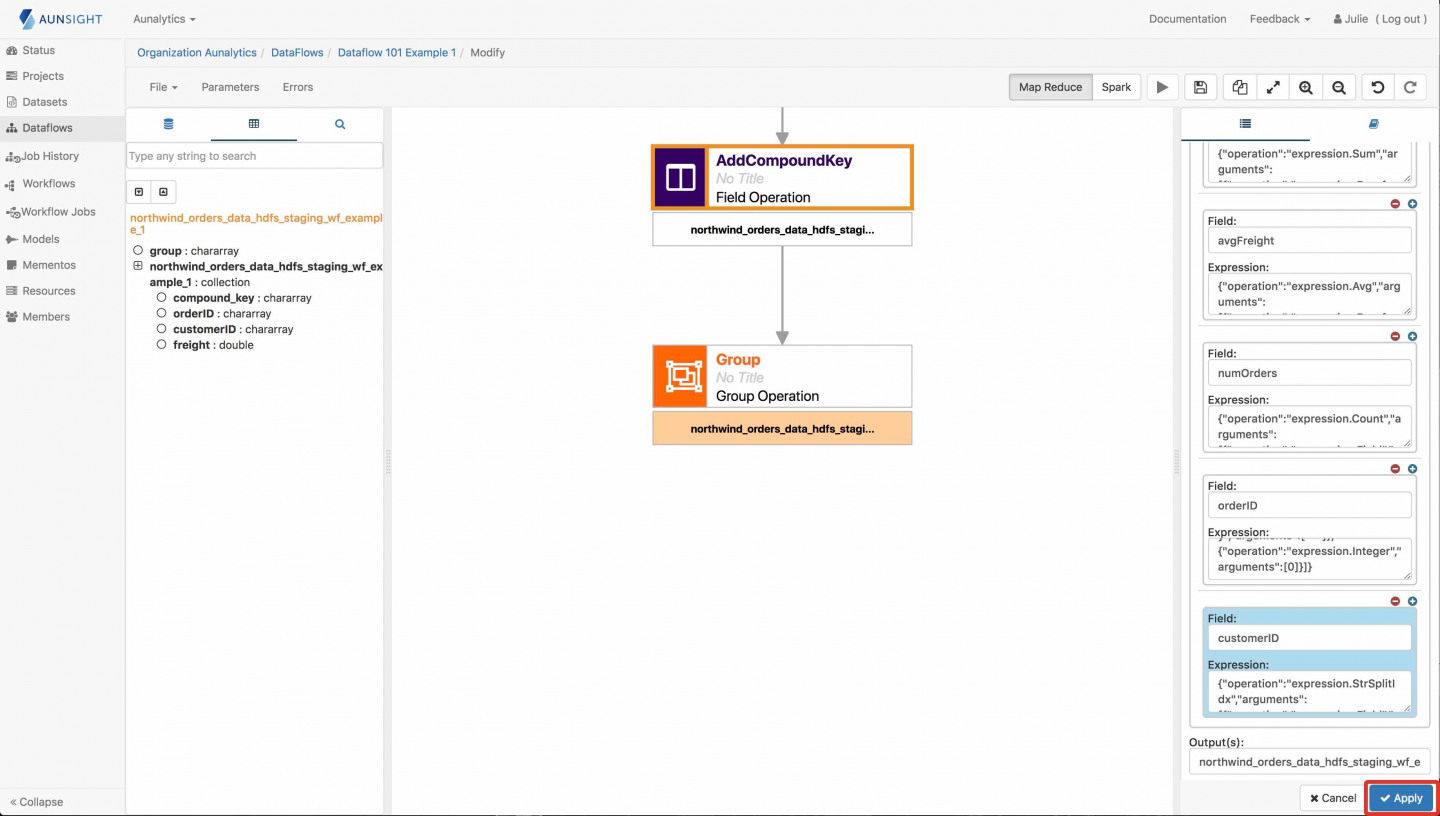
- Select the dataset at the end of the Group operation, and add the Add Field(s) operation.
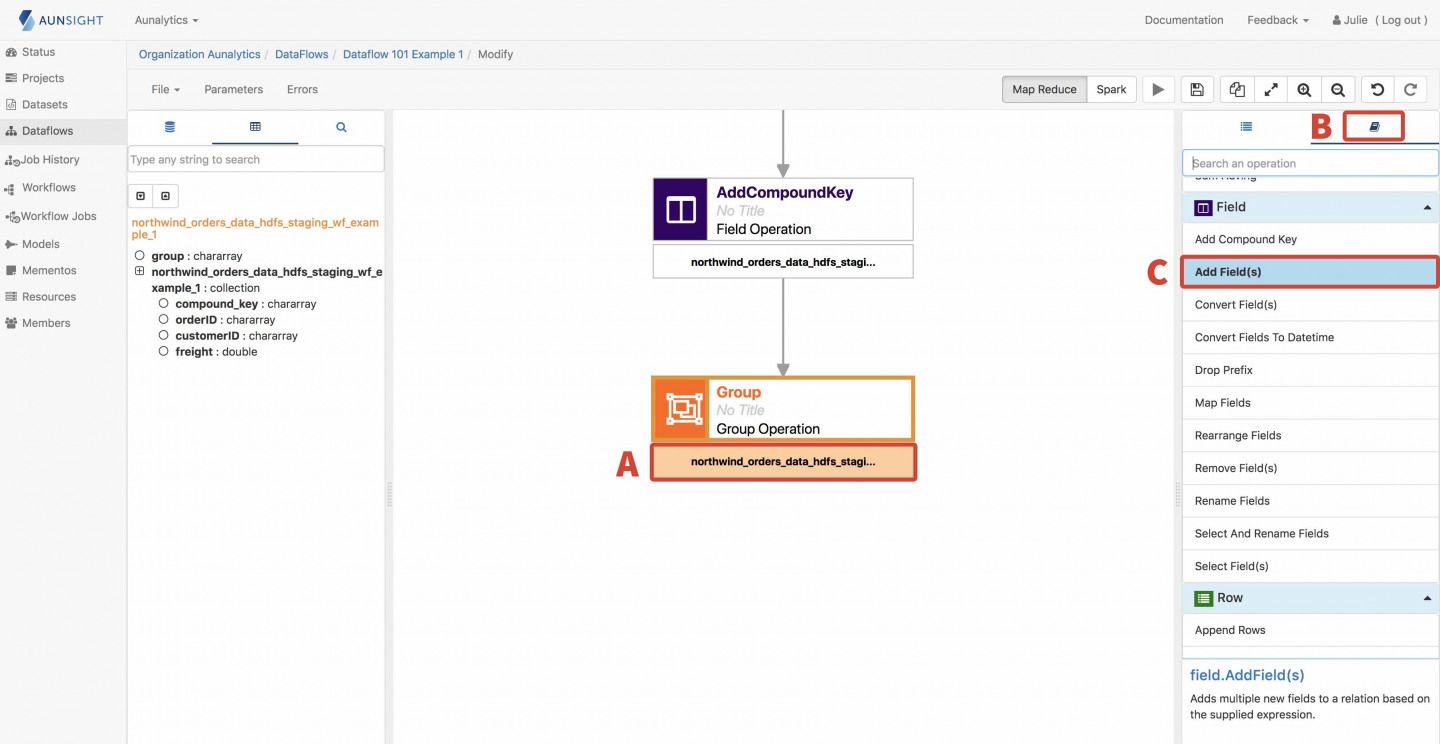
- Add the following fields by using the Expressions Builder:
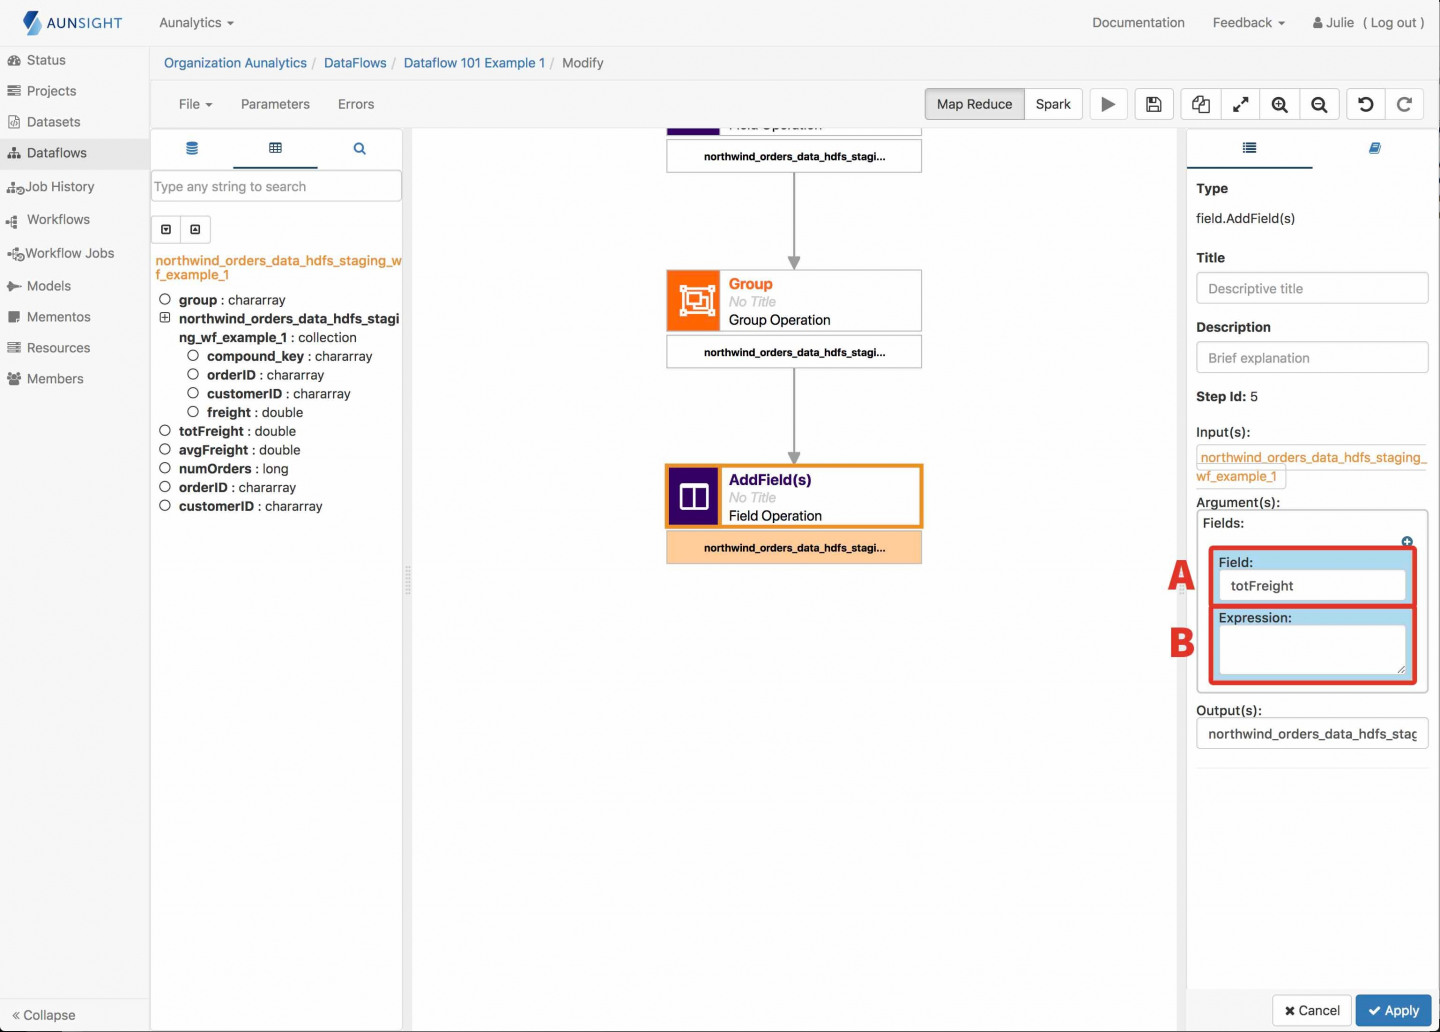
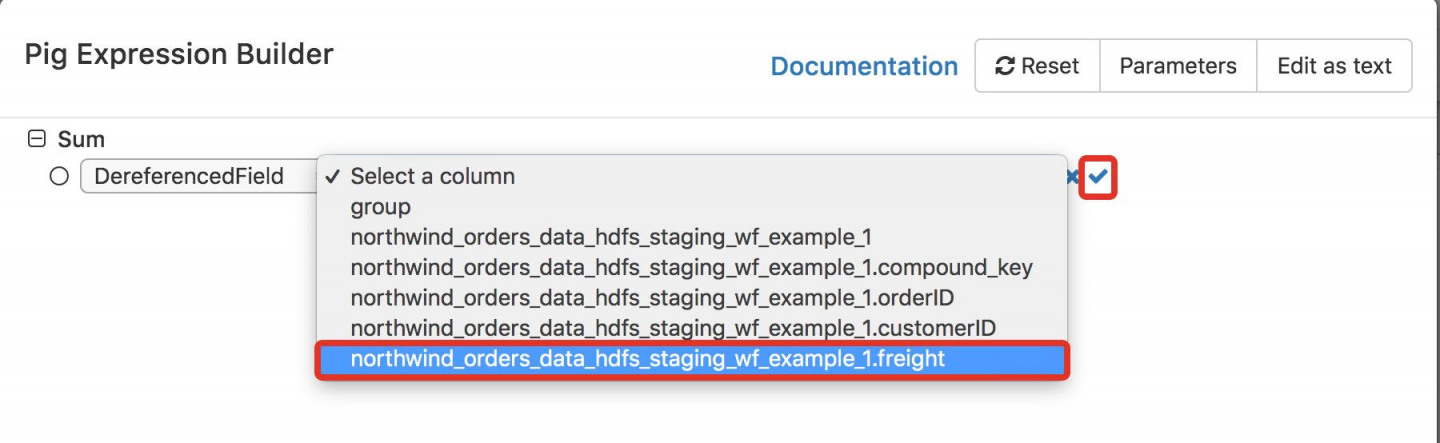
- A) Calculate Total Freight:
- Create a new field named totFreight:
- Click in the Expressions pane.
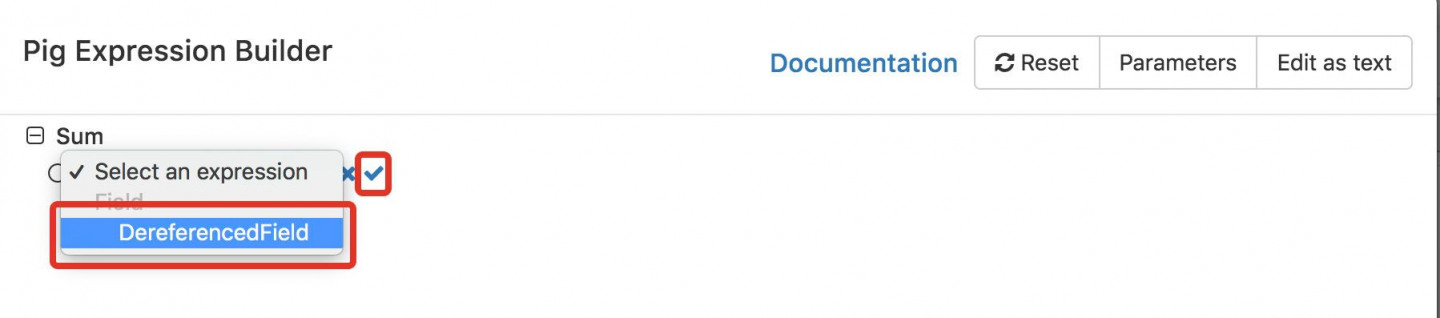
- From the dropdown that appears, select Sum under Math and click the checkmark.
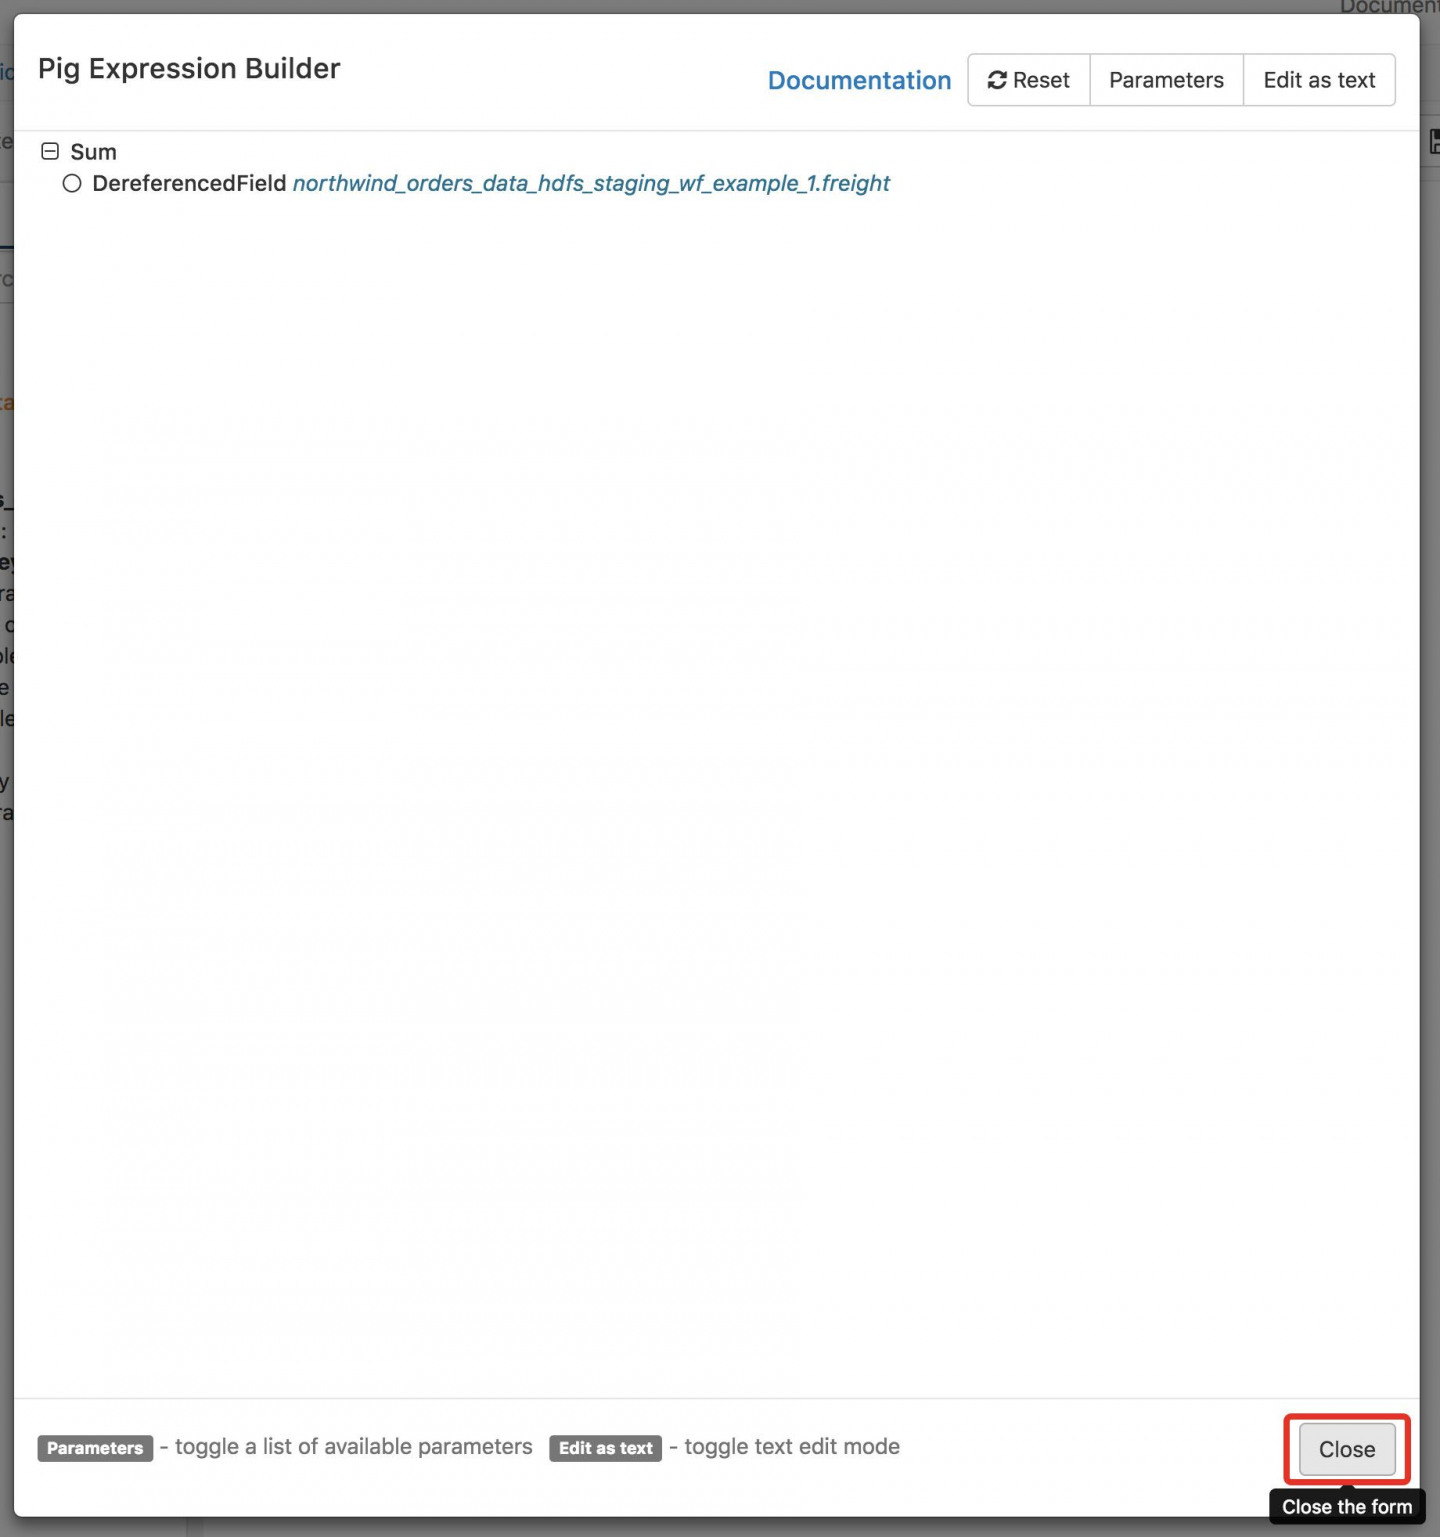
- From the subsequent dropdown, select DereferencedField, and in the adjacent dropdown, select the field ending in .freight and click the checkmark.
- Click close.

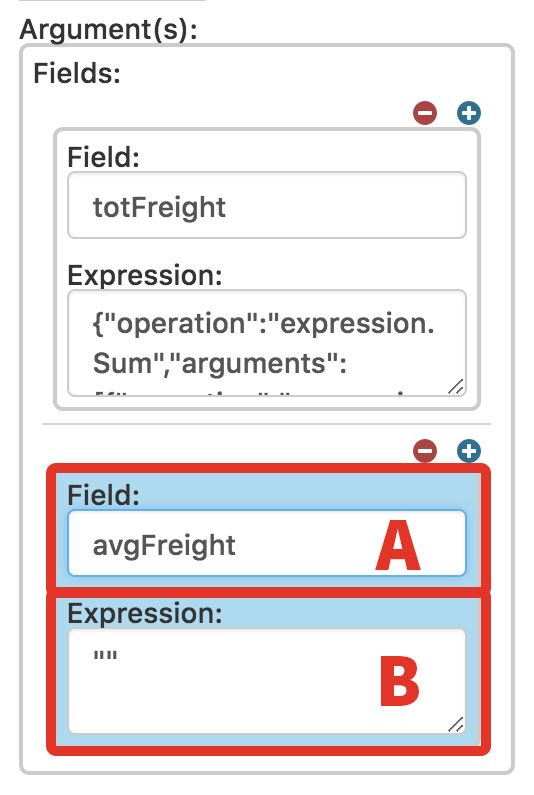
- B) Calculate Average Freight:
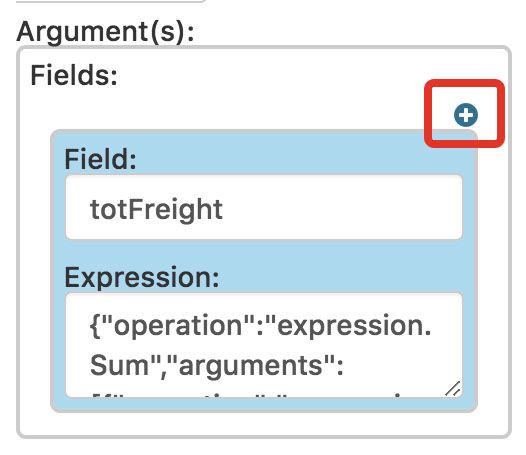
- Click the plus button on the Fields Panel.
- Create a new field named avgFreight:
- Click in the Expressions pane.
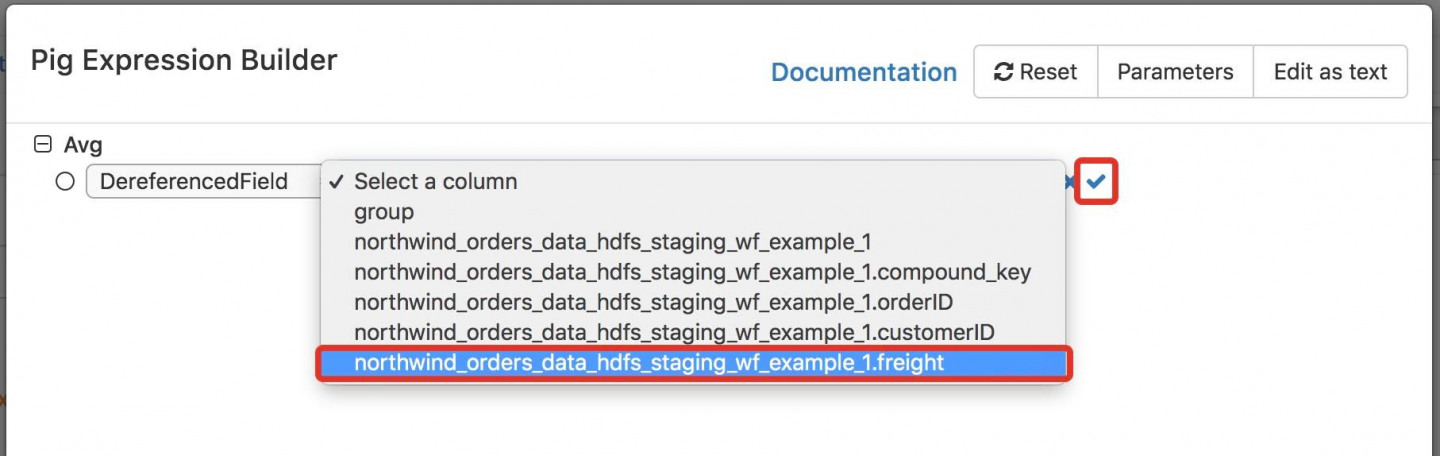
- From the dropdown that appears, select Avg under Math and click the checkmark.
- From the subsequent dropdown, select DereferencedField, and in the adjacent dropdown, select the field ending in .freight and click the checkmark.
- Click close.

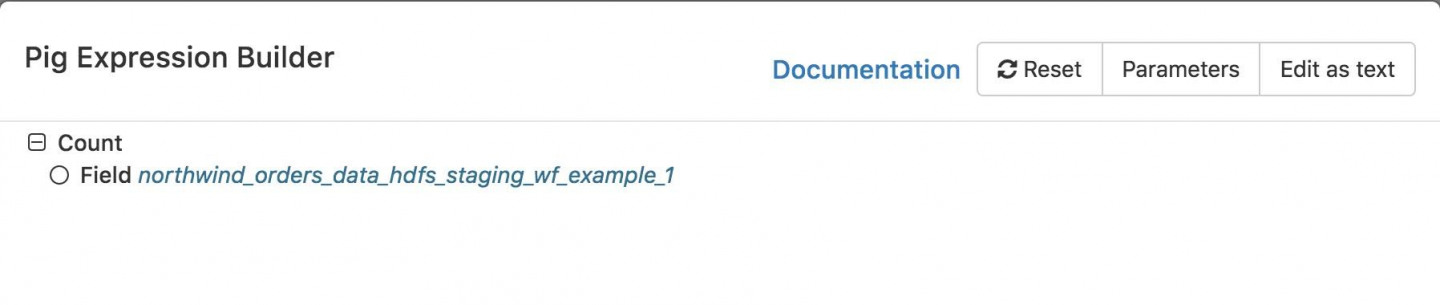
- C) Calculate Number of Orders:
- Click the plus button on the Fields Panel.
- Create a new field named numOrders:
- Click in the Expressions pane.
- From the dropdown that appears, select Count under Math and click the checkmark.
- From the subsequent dropdown, select Field, and in the adjacent dropdown, select the field ending in wf_example_1 and click the checkmark.
- Click close.
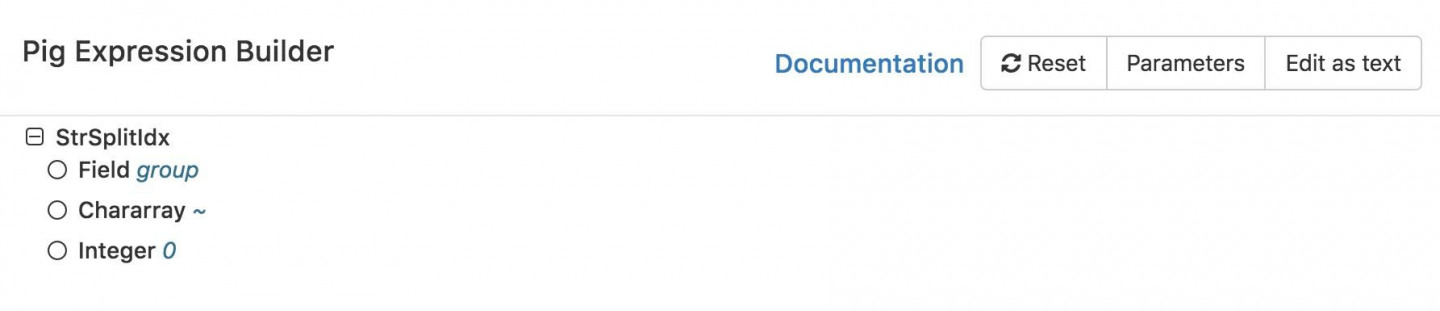
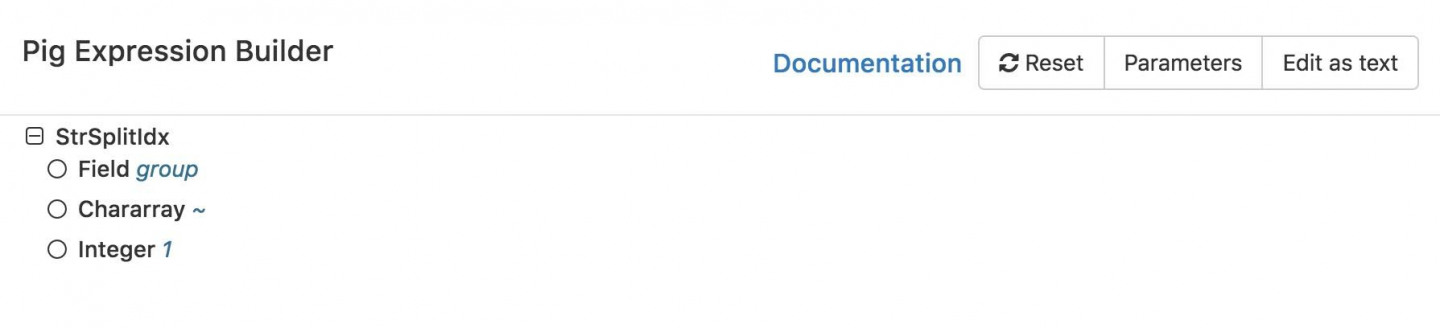
- D) Create Order ID Column:
- Click the plus button on the Fields Panel.
- Create a new field named orderID:
- Click in the Expressions pane.
- From the dropdown that appears, select StrSplitIdx under String and click the checkmark.
- From the top dropdown, select Field and in the adjacent drop select the field group and click the checkmark.
- From the second dropdown, select chararray and enter ~ in the text box and click the checkmark.
- From the third dropdown, select third and enter 0 in the text box and click the checkmark.
- Click close.
- E) Create Customer ID Column:
- Click the plus button on the Fields Panel.
- Create a new field named customerID:
- Click in the Expressions pane.
- From the dropdown that appears, select StrSplitIdx under String and click the checkmark.
- From the top dropdown, select Field and in the adjacent drop select the field group and click the checkmark.
- From the second dropdown, select chararray and enter ~ in the text box and click the checkmark.
- From the third dropdown, select third and enter 1 in the text box and click the checkmark.
- Click close.
- Click Apply.
Dataset View After Add Fields
| group | northwind_orders_data_hdfs_staging_wf_example_1 | totFreight | avgFreight | numOrders | orderID | customerID |
|---|---|---|---|---|---|---|
| 10248~VINET | [{“compound_key”: “10248~VINET”, “orderID”: “10248”, “customerID”: “VINET”, “freight”: 32.38}] | 32.38 | 32.38 | 1 | 10248 | VINET |
| 10249~TOMSP | [{“compound_key”: “10249~TOMSP”, “orderID”: “10249”, “customerID”: “TOMSP”, “freight”: 11.61}, {“compound_key”: “10249~TOMSP”, “orderID”: “10249”, “customerID”: “TOMSP”, “freight”: 65.83} ] |
77.44 | 38.72 | 2 | 10249 | TOMSP |
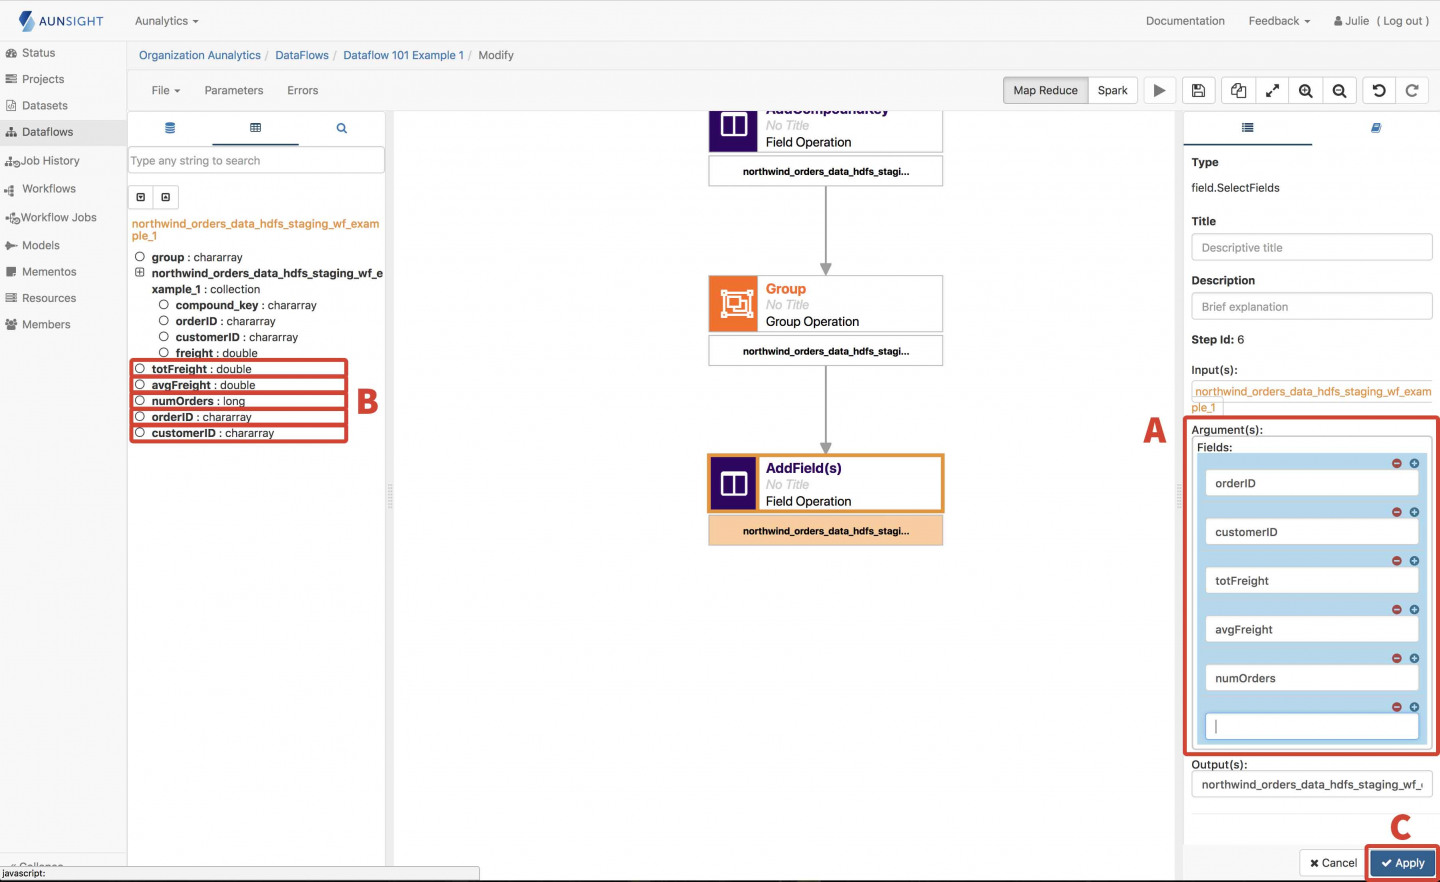
- Select the dataset from the Add Field(s) Operation (Make sure the bottom rectangle with the dataset name is highlighted), and then add the Select Fields Operation.
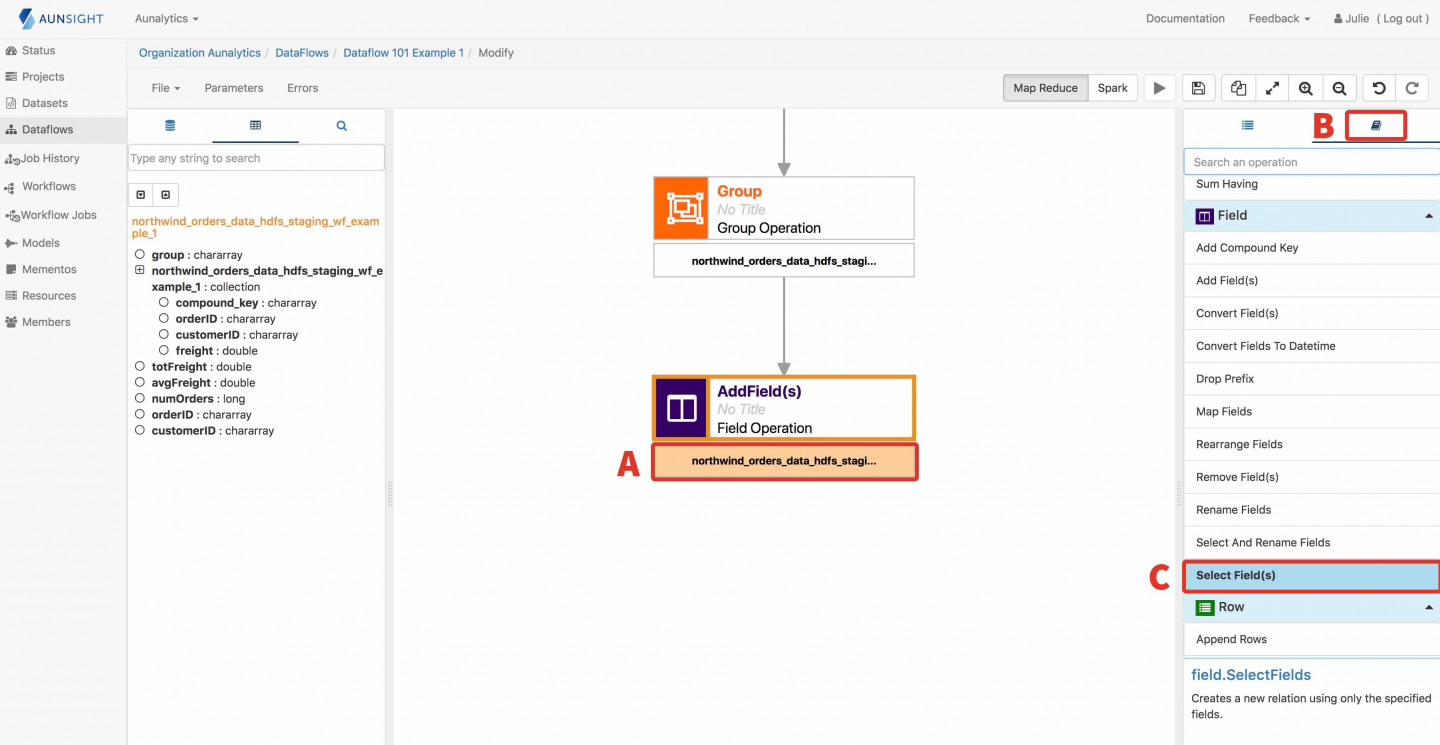
- In the Argument(s) box on the right side panel click on the box below Fields, then add the fields customerID, totFreight, avgFreight, and numOrders from the left panel. Hit Apply.
Dataset View After Select Fields
| orderID | customerID | totFreight | avgFreight | numOrders |
|---|---|---|---|---|
| 10248 | VINET | 32.38 | 32.38 | 1 |
| 10249 | TOMSP | 77.44 | 38.72 | 2 |
- Click on the disks/datasets icon on the left side panel.
- Click Import dataset.
- Search for and select DataFlow101 Output.
- Click Import.
- Select the dataset from the bottom Select Field(s) operation (Make sure the bottom rectangle with the dataset name is highlighted), and then add the Store operation.
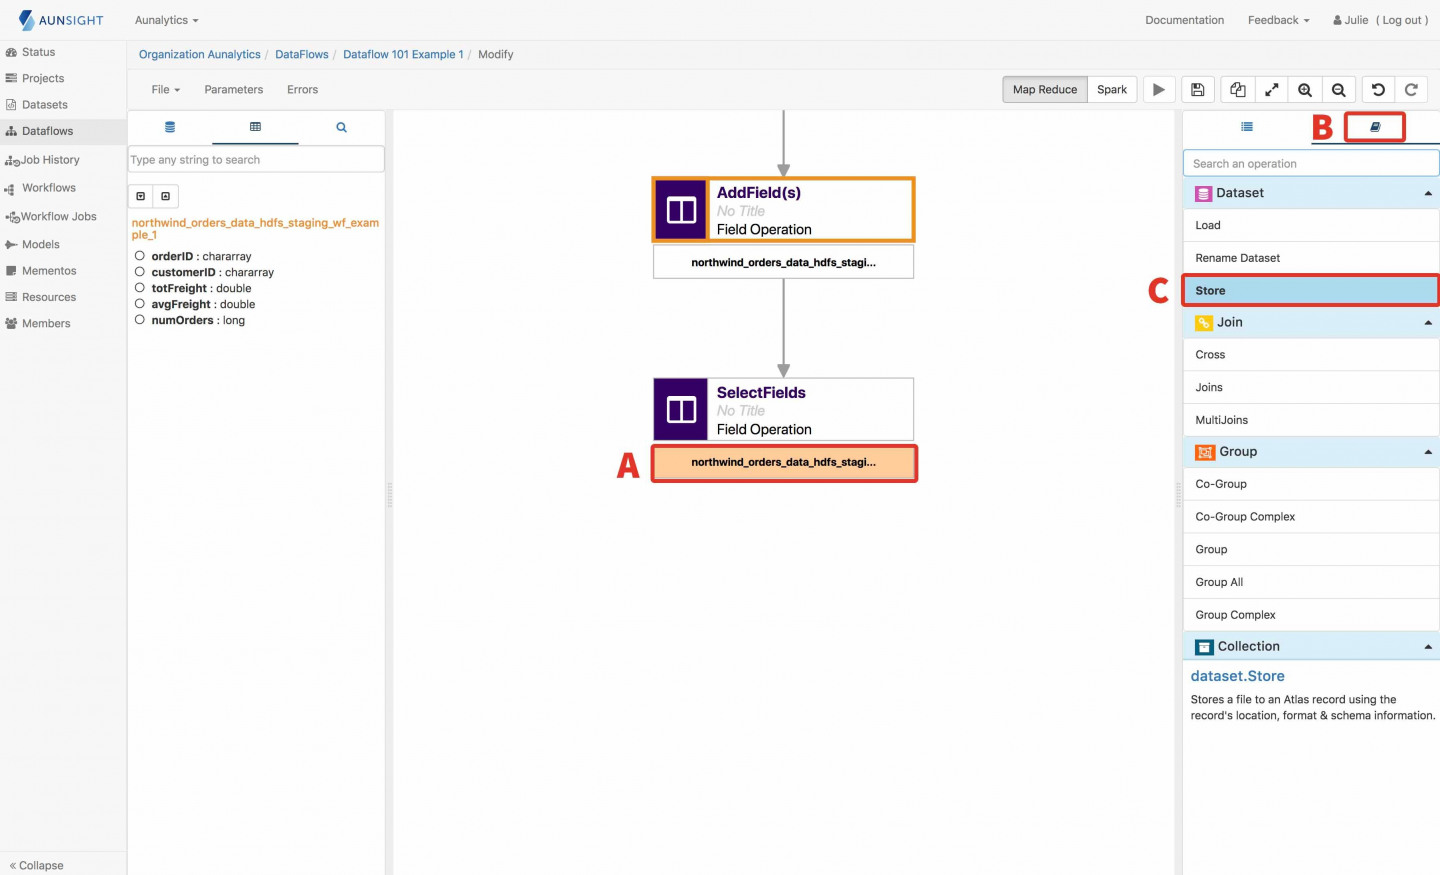
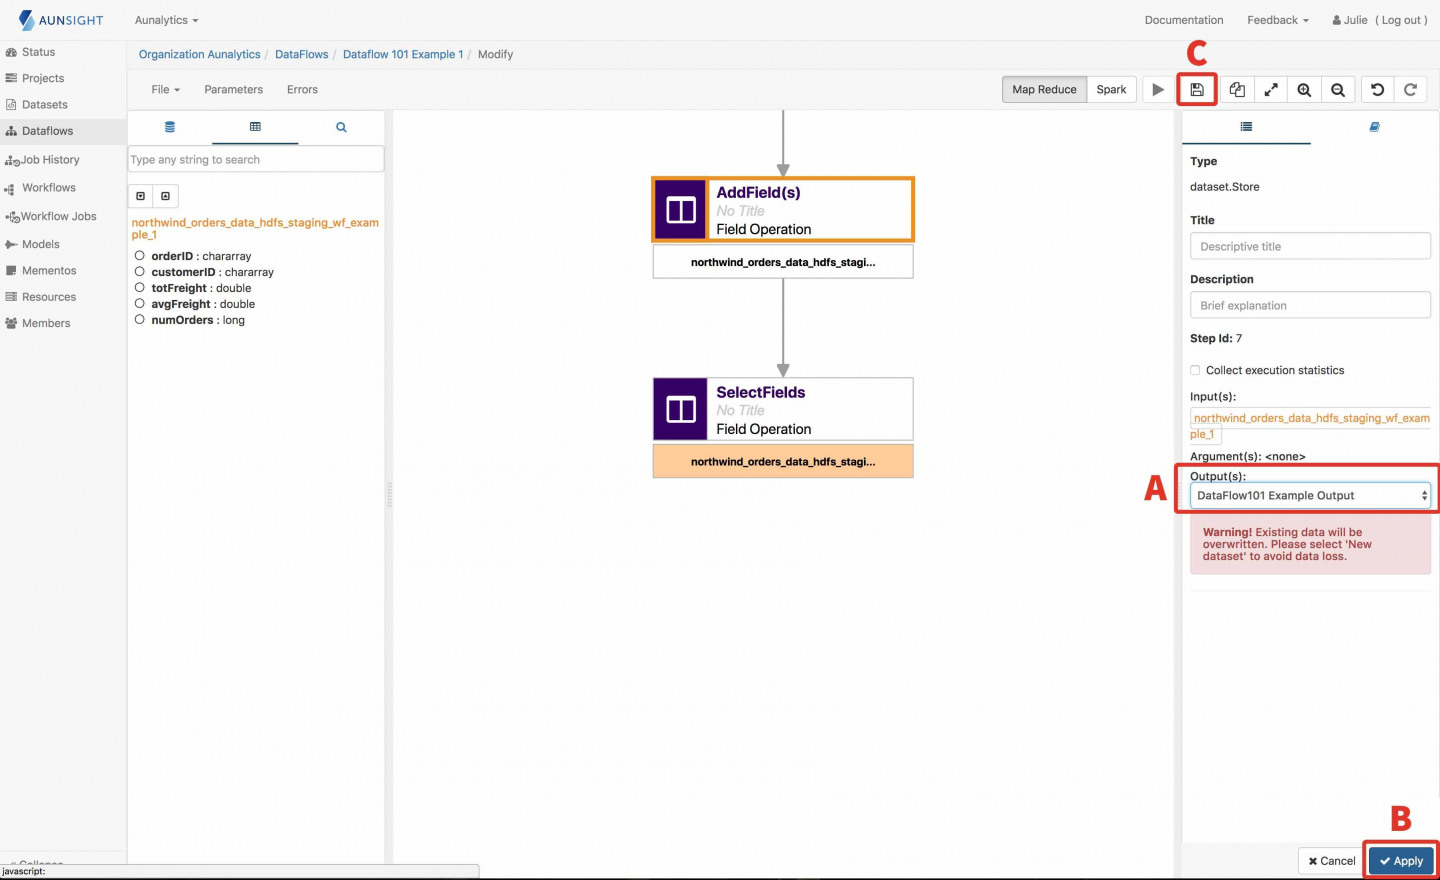
- From the dropdown select the DataFlow101 Output if it is not already selected.
- Click Apply.
- Click Save.
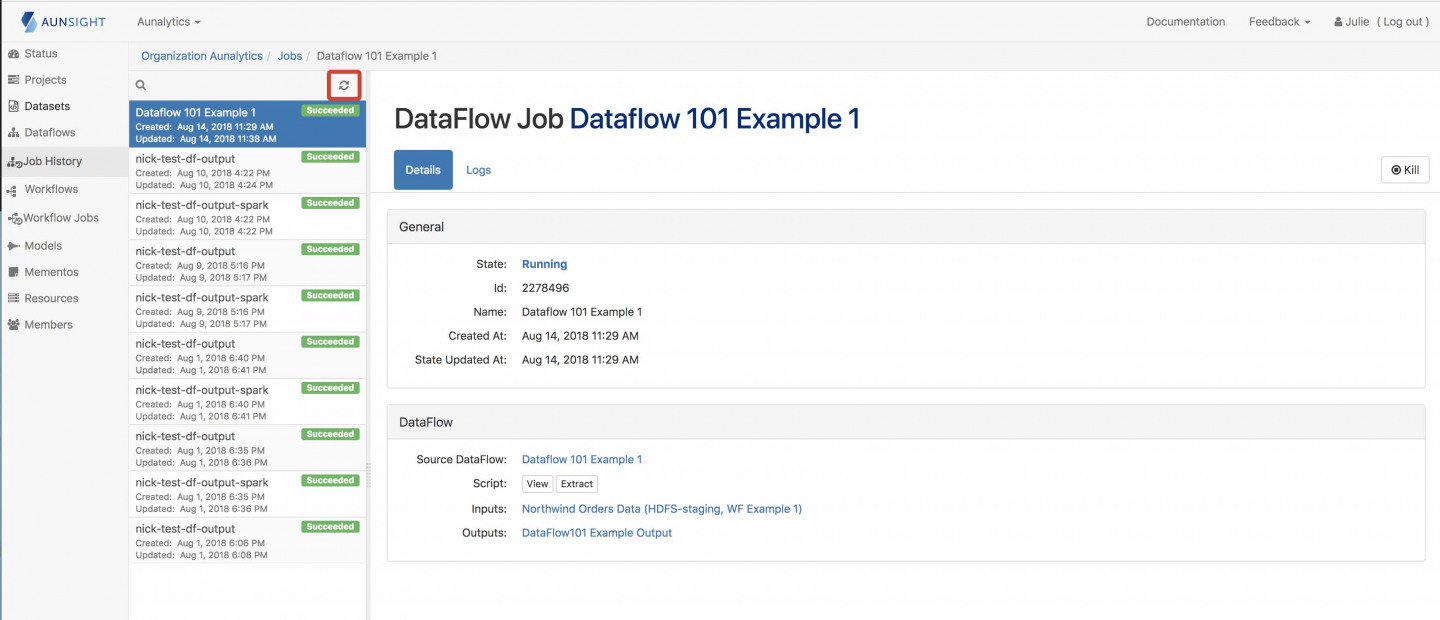
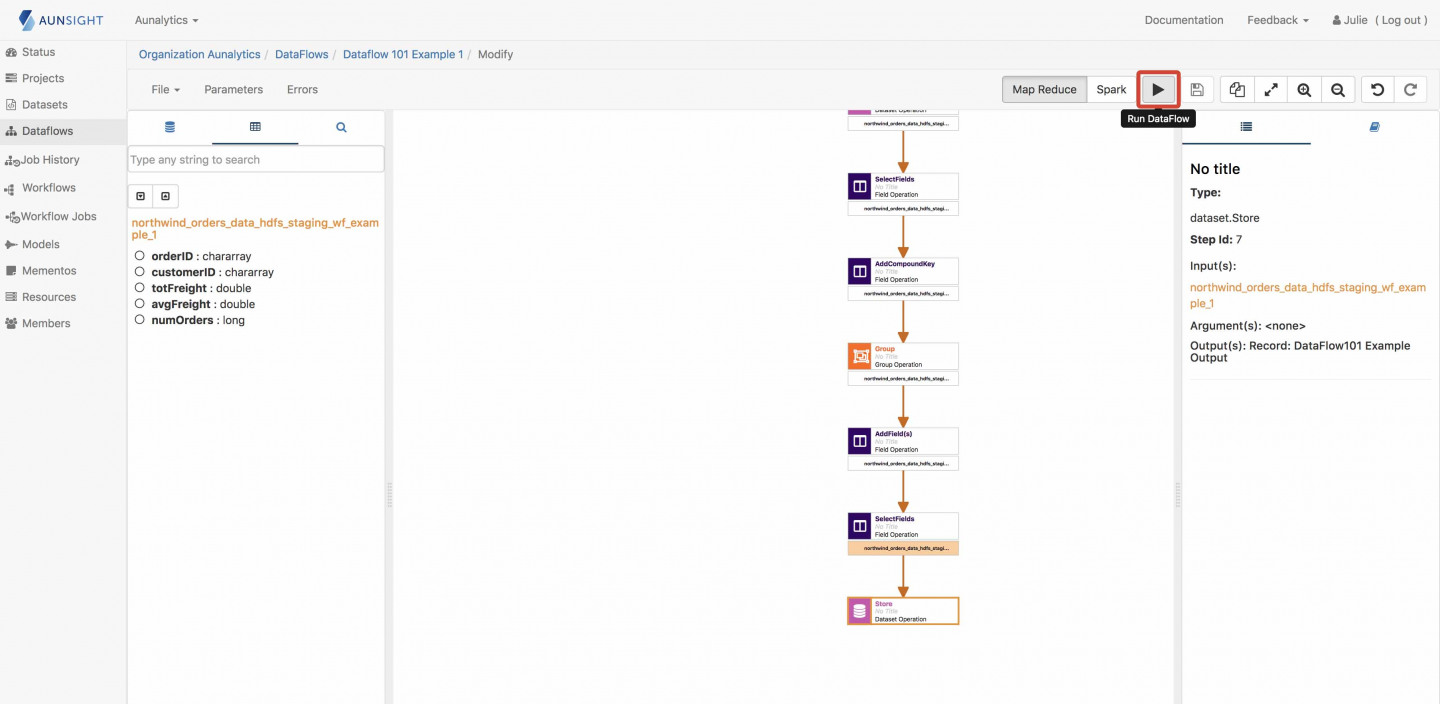
C) Running a Dataflow
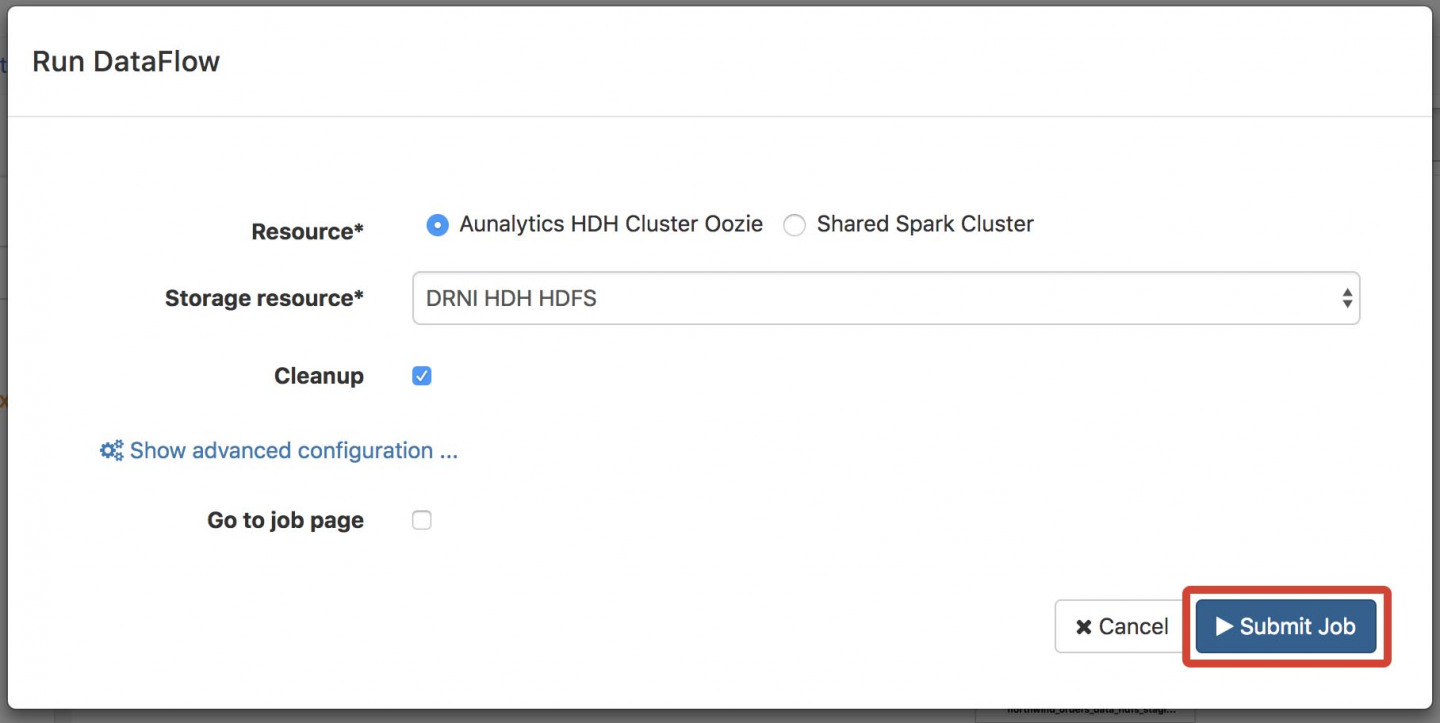
- Click the Run button.
- Click Submit Job.
- Go to the Job History tab on the menu on the far left side of the screen.

- Refresh every 30 seconds or so until the job completes.